Feature Turnover Guide
I had written a whole post on turnovers, but quickly found that it went out of date. So here's my attempt to write a more future-proof guide to getting the materials of your film turned over to all the various departments that editors and assistant editors interact with. This post primarily deals with turnovers to sound, music, and DI/online. There will be another post dealing with VFX.
For the TL;DR crowd, see my normal spec list
What Is A Turnover?
When you hear someone referencing a turnover, it simply means the handing off of all or part of the film from Editorial to another department. Since the other departments on your project (sound, music, vfx, digital intermediate/online conform, etc.) don't generally have access to your editing system and all of the media you're using, you have to give them the material to work from in the appropriate format for what they need to do with it.
How Do I Know What To Turn Over?
Once you do this a few times it'll become an easy and predictable task. The first time you do it, it may be a little intimidating, and you may have lots of questions that even the people you need to turn over to can't answer. To help, always think of what your turnover recipients are going to do with your materials once you hand them off. What's most useful for them? What would get in the way if it was done wrong? Putting yourself in their shoes can help you answer a lot of questions on your own.
For example, sound and music departments often ask for split audio Quicktimes. For sound, this means dialogue on the left channel and sfx/music on the right. For music, however, this means they want dialogue/sfx on the left channel and music on the right. If you pause to think about why these specs are that way, it will help inform any other questions that come up. Sound departments' primary concerns are cleaning up your dialogue and adding a great sound effects track. So it makes sense that for their offline reference they'll want to be able to hear clean dialogue, and mute your temp sound effects and temp music if they want to. For a composer, many of them have no interest in hearing your temp music, so they want to be able to keep your dialogue and sound effects while composing a new score in place of your music track. As I mention below, though, I now tend to make stereo WAVs of dialogue, sfx, and music all separate from the Quicktime so that I don't have to deal with panning a stereo QT and they have even finer grain control over the audio they hear.
On the picture side, an example might be the request not to letterbox your reference Quicktime when turning over to the DI. If you think about it, the DI facility is responsible for recreating your cut using your RAW footage or scanned film frames. The more information they can get about how you cut the film together, the faster they can work and the more accurate their timeline will be. EDLs go a long way, but sometimes you just have to go frame by frame and see what's in the cut. If you matte your reference Quicktime, they might have to eye-match to your footage, which is time-consuming and error prone. By not matting your reference Quicktime, they can see the source filename and the timecode burn-in of each frame, and cross-check that with their online edit.
Components of a Turnover
These are most of the common items you'll need to generate for a turnover. You need a set of these for each reel unless otherwise noted.
- Quicktimes or MXFs
- Guide Tracks for dialogue, sound effects and music, usually as stereo WAVs
- AAF (a.k.a. OMF) of your audio tracks
- Change Lists (a text file detailing the difference between two versions of the cut), or Rebalanced Change Lists (if you've rebalanced reels)
- Picture EDLs or Assemble Lists for a DI or Online
- Audio EDL of your dialogue tracks
Quicktimes or MXFs
First and foremost, a turnover generally requires a visual reference of your project, and this is usually a Quicktime or Op1a MXF rendered out from your editing application. For a film project, which is what I'll focus on here since that's my primary area of work, this usually means one Quicktime/MXF file per reel. Before you render a Quicktime/MXF out, you should check a bunch of things:
- Do your reels have head and tail leader?
- Head leader is an 8-second countdown with a one frame audio pop on the 2. Tail leader has a Finish frame and pop 2 seconds in, but can be of varying length after that. I usually go with a 10 foot (160 frame) tail leader. Get in the habit of putting your leader and audio pops on every track in your sequence, not just V1 and A1 (but do lower the volume of all the pops to a comfortable level).
- Do your reels each start on the right hour?
- Film reels start on the hour according to their reel number, including head leader. So Reel 1 should have a Start TC of 01:00:00:00, Reel 2 at 02:00:00:00, etc. On your head leader, the hour mark would correspond with the Picture Start frame, and your first frame of content would be at 8 seconds flat.
- While checking Start TC you should also verify that your Footage counter is zeroed out. In Avid, if you right-click on your sequence and go to Sequence Report, you can check the starting Footage (or EC, for Edge Code) count of the sequence and reset it to 0+00 if need be.
- Does your sequence need a matte?
- Most departments will not want to see all the burn-in information such as filename, source timecode, audio timecode, etc., so you'll want to keep a matte handy to cover it all up to the appropriate aspect ratio of your project.
- Some departments will want to see this information, and you should be sure not to matte your burn-ins for them. When turning over to the DI or to anyone in Marketing (trailer editors, e.g.), don't include a matte.
- Does your sequence need additional burn-ins such as TC or Feet & Frame counters?
- Most everyone will want a visible timecode counter on every turnover you make. I usually put sequence TC in the upper left and F&F in the upper right corners of the letterbox, and I make the font size pretty big so it can be read at a glance from far away.
- There is a school of thought that you can export QTs more quickly by adding these counters with other software (Compressor, e.g.) after the initial export from your NLE. I really disagree with this approach, because the burn-ins you add directly into your sequence serve as a good double-check that everything is as it's supposed to be. All of your other deliverables (AAFs, WAVs, EDLs, etc.) will be wrong if your sequence TC is off and you didn't notice that because you just exported your video without a burn-in and pasted one on later.
- Have you burned-in the name and date of your sequence somewhere in the frame?
- You'll send lots of turnovers over the course of a film, and you need to give your turnover recipients a way to talk with you about a particular version. If you put the sequence name and date visible on screen, that gives them multiple ways to refer to a particular version or a particular date. For example, R1_v20_SOUND_140204 might be how I'd name a Reel 1 (version 20) sequence for Sound that I delivered on 2/4/14.
- Sometimes, as with trailer editors, you'll receive Quicktimes back that have been cut together using multiple turnovers and asked to reconstruct that edit in the Avid. In this case, knowing exactly which turnover sequence each shot is referring to and what timecode a shot was pulled from will help you to quickly do your overcut, so having a lot of information burned-in can help you later on as well.
- What kind of security markings do you need to add?
- I usually keep a bin of title templates handy that add things like Property Of Production Company, the date, and the name or initials of the person receiving the file. These burn-ins go in frame, not in the letterbox, so that people can't crop them out as easily. I put security titles on my topmost video track so it doesn't get buried by anything. If you have subtitles in your film, make sure you're not covering them up.
- Some studios have a spec sheet for how they like their security markings, and others just want something but aren't specific about what or where in the frame they want it. It's all pretty standard, but I like to have my text be partially transparent so as to be very visible but not super annoying to watch.
- Does your Quicktime/MXF need embedded audio?
- I personally prefer to export audio separately and leave my Quicktimes/MXFs mute. Most of the time this is ok, but sometimes you'll need to embed audio. If you need to embed split audio (Left channel: dialogue, Right channel: music/sfx, e.g.), I usually recommend against doing this in Avid since it involves re-panning your sequence. Avid doesn't do well with re-panning, especially if you've used AudioSuite effects in your timeline. In that case I export dialogue, music, and sound effects separately as mono WAVs and then add them to the exported Quicktime using Quicktime Pro, panning them there as necessary.
- Is there a specific codec required? If not, what is the best codec?
- EDIT August 2018: This paragraph used to recommend codecs that are now outdated, and since it's now much easier to transfer large files and more applications support DNxHD, I use DNxHD for everything. Probably within a couple years that will include DNxHR, which as of this writing I am only just starting to try out. H.264 is still a no-no for turnovers for a variety of reasons including that it does frame interpolation, color often gets crushed upon export from Avid, and H.264 is meant mainly as a playback codec and not as a means for actively working with video files.
Here's an example of what a fully prepped Quicktime could look like. I didn't have much content I could post publicly, so instead you get to see me solving the Golf Ball Water Globe. Notice the tracks are split, too. The burn-in is maybe a little big.
Guide Tracks
This is self-explanatory, but it's one of the main reasons to try to keep your audio tracks organized. When you get into post you'll have to turn over a set of audio files (usually WAV or AIFF) that contain only dialogue, only effects, and only music. The only way to export these files is to keep the audio clips on separate tracks, so I usually do the work of splitting my tracks out in a duplicated sequence for the first turnover and then copy the split tracks back into the main reels so that my work is preserved even as the edit changes.
Each guide track should be exactly the same length as your Quicktime, and have a 2-pop and finish pop as described above so that the guide tracks can be lined up with the Quicktime in an audio editing application to assure the sound team that everything is in sync.
AAF (a.k.a. OMF)
An AAF is a file that allows you to give your timeline to other applications. For example, an AAF of your audio tracks can be imported into Pro Tools where a sound editor can work with your clips exactly as you've cut them in your NLE. At the minimum, AAFs contain metadata about your timeline and the clips in it. You can also choose to include the media that those clips reference inside of the AAF, or you can have the AAF link to an external media directory. Either way, you would usually export an AAF with media handles, so that the person receiving your file has a bit of extra media on either end of each clip's in/out points.
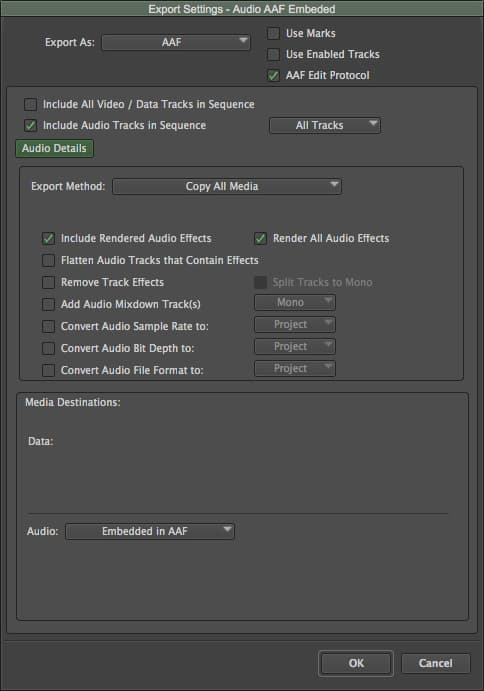
If you're making an AAF for ProTools, make sure you have AAF Edit Protocol set. This will allow your AAF to exceed 2GB in file size if it needs to. I also usually set the options to Render All Effects and Include Rendered Effects. Be a little careful with this, as you might run into the same problem with AudioSuite effects that I mentioned above. It's best to make sure all of your AudioSuite effects are rendered in your timeline before starting to make any turnovers. You can render them globally using the fast menu of the AudioSuite window. If there were unrendered effects in your timeline, check that they rendered correctly before going further.
The terms AAF and OMF are mostly interchangeable, or are at least used interchangeably by many people including myself. This is because OMF is the original file format everyone used, but now the AAF file type has superseded it. This is in part since OMF files are limited to a maximum size of 2GB, which isn't enough if you're embedding a full reel's worth of audio. If you're running a newer version of Avid, you will only be able to export an AAF. FCP7 will only export OMFs natively, and AAFs with Automatic Duck. I have no idea what FCPX can do, but you probably need to buy a plug-in to get AAF functionality. In any case, the two files are almost the same thing, and a lot of people will still ask for an OMF even though they actually need an AAF.
Also, if your project is still using OMF audio media, which is different than making an OMF files, that can cause some weird problems with AAF exports, among other things. There are many reasons why you should not have any OMF audio in your project, and there is not a single reason why you should. Consciously using OMF audio in Media Composer is like willfully using Windows 95 when a new Mac is available. Don't do it, go MXF/PCM all the way and you'll save yourself a lot of headache.
Cut Lists, Change Lists, and/or EDLs
Cut lists and EDLs tell other people and other applications about the order and duration of clips in your timeline. For Change Lists specifically, even though every department we interact with relies heavily on our ability to make them, they are currently a nightmare to make in Avid Filmscribe. The program has been super buggy for years to the point where it's almost unusable, and it can require you to spend a lot of time simplifying your sequence before Filmscribe will make a change list without crashing. I can't accurately describe the loathing I have for Filmscribe. That said...
Cut Lists
Cut Lists are good for giving to DI companies when doing your conform. They can reference either source timecode for tape or file-based footage, or list keycode for material originating on film. Fewer and fewer companies are using Cut Lists, though, and instead opting for other methods involving EDLs.
Change Lists
As soon as you turn over your movie more than once, you'll likely need to hand over a change list. As you would suspect, this tells the person receiving your turnover how the edit changed between the last time you gave it to them and now. For sound and music departments, this helps them conform their ProTools sessions so they can update and smooth over their sessions to match the new version of picture. For the DI, a change list helps them match their online sequence to your offline Quicktime reference, and then determine if there's new material they need to get from you in order to recreate your cut.
Until Filmscribe gets a total rewrite, it's best to thoroughly scrub your sequences clean of complexity before loading them into the app. By this I mean you should reduce your sequences to the fewest number of tracks possible, save one layer out of any collapsed clips before removing them, and then remove any additional effects. Since you need Filmscribe to tell you only what's changed, be sure to reduce the complexity of your sequence the same way every time. For example, if you pull the V1 layer out of a collapsed clip the first time, make sure you do it the second time, too. Try to make the sequences as similar as possible, so that the change list only reflects actual changes instead of having a lot of events in the list that look like changes but aren't.
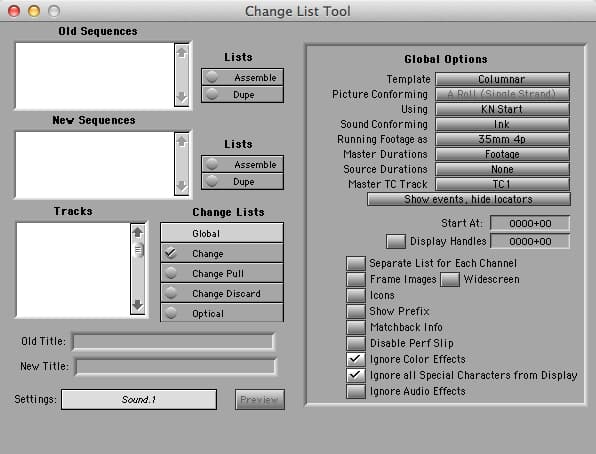
Once you've got your sequences set, drag the appropriate sequences into the Old and New sections, set your settings and click Preview. I usually like to do a Columnar or Optical Block list with Master Durations and Ignore Color Effects set (though you should've removed all of these already). Under the Change List options I select only Name, and KN Start if applicable. Save it out as a .txt file and you're good to go. If the app crashes instead of giving you a previewed file, you might still have an effect in your timeline that it's too dumb to handle.
Rebalanced Change Lists are made when you've moved a chunk of footage from one reel to another. To make one of these, first make sure your sequences have the Reel column filled out in your bin. Then in Filmscribe, drag your two old sequences and two new sequences into the appropriate spots and make your list. If you don't do this and make only single change lists from each version, it won't be clear from the change lists that material was moved between reels. It will just look like you deleted a bunch of stuff from one reel and added a bunch of other stuff to another.
EDLs
EDLs are a timecode-only (no keycode) list of "events" that describe, in order, the clips in your timeline. They're a relic from the days of tape, but they're surprisingly useful for all sorts of other things. Most editing and finishing applications take them, and they provide a simple and standard way to define a timeline and the material in it. For example, color correction software can use it to notch a timeline, so that if you give them a Quicktime to color-correct, you can also give them an EDL to tell them where each shot starts and ends. You can also use them to get a source list of the files used in your edit, or to get information out of Avid and into another form, such as a Subcap file. I also sometimes receive them, as in the case where you're finishing a DI and the DI company sends you an EDL of all the VFX shots they've cut into their timeline so you can check that all the shots are there and are the right version.
Normal options for EDLs are to include the Source Clip Name, Locators, and Effects. Make sure to use the File_16 or File_32 list format if your source is an Alexa/RED/Sony/etc. so you can fit the full filename in. For digital cameras you should always have your full filename in the Tape bin column. DaVinci Resolve, which many DITs use to transcode footage for Editorial, does not have that option turned on by default, so make sure the DIT turns it on in the Timeline Conform pane in Resolve. If you get footage without proper info in the Tape column, I usually recommend duplicating the filename from the Name column into the Camroll and Labroll columns before renaming the Avid clips into Scene/Take format. The Camroll and Labroll columns are more easily changed than the Tape column, but if you're careful it should work fine, be redundant, and either of those two columns can be used in EDL Manager in place of Tape.
Audio EDLs are useful for dialogue editors to go back and get the original audio file's iso tracks, and most will ask for a set of EDLs on your first turnover to the Sound department to help them. In this case you would turn off all the V tracks in EDL Manager, turn on all A tracks containing your dialogue, and use the Soundroll column as your source tape setting (if you have Soundroll and Sound TC filled in). If you don't have Soundroll and Sound TC info, adjust these settings to match whatever metadata you do have.
One word of advice: always check the Console if EDL Manager gives you a warning message. It looks daunting but it will tell you what clips didn't have the metadata it was expecting, and you can use that to see if you have a problem or if you can ignore it and keep going.
My Usual Specs
Unless I hear otherwise from the departments I'm working with, here are the specs I will give them for each reel:
Sound
- Mute Quicktime/MXF - 1080p DNxHD 36 or 115. QT is letterboxed with sequence TC and F&F burn-ins, along with sequence name, date, and security markings. Sometimes you may want to leave it unletterboxed if there is audio timecode that the sound department wants to see.
- Stereo WAVs - one each for dialogue, music, and sfx tracks
- AAF with 96 frame handles, AAF Edit option checked, media embedded if necessary. Render All Effects and Include Rendered Effects options checked, but no others
- Audio EDL of each reel's dialogue tracks (usually for the first turnover only)
- Change List (from the last version they received to the current one. They might not be sequential versions)
Music
- Mute Quicktime/MXF -1080p DNxHD 36 or 115 unless otherwise requested by the composer. QT is letterboxed with TC and F&F burn-ins, along with sequence name, date, and security markings
- Split Stereo WAVs - one each for dialogue, music, and sfx tracks
- AAF with the same options as above, if requested.
- Change List (from the last version they received to the current one. They might not be sequential versions)
DI
- Mute Quicktime/MXF - 1080p DNxHD 36 or 115 (or whatever is Same as Source). QT is not letterboxed, but still has sequence TC and F&F burn-ins, along with sequence name, date, and security markings
- EDLs of split video tracks, so that's one EDL per camera type (35mm, RED, GoPro, etc.), one EDL with all VFX, and one EDL with any opticals (resizes, speed effects, dissolves).
- Stereo WAV, not split out, for reference and so they have something to play during reviews
- Avid bin containing your sequence(s), if requested
- Change List (from the last version they received to the current one. They might not be sequential versions)
- Pull List and Cut List (for film only)
Marketing
- Mute Quicktime - 1080p DNxHD36 or ProRes (Gamma Correction Off), no fast start. QT is not letterboxed, but still has sequence TC burn-in with sequence name in large font, plus date and other security markings. I usually make security markings for Marketing turnovers big and annoying, since these often get forwarded on to multiple companies out of your control or contact.
- Split Stereo WAVs - one each for dialogue, music, and sfx tracks.
- If embedded audio is required, dialogue on Left channel, sfx and temp score on Right (or sometimes full mix on Right, if requested)
ADR
- Mute Quicktime -1080p DNxHD 36 (unless ADR requests otherwise). QT is letterboxed with TC and F&F burnins, along with sequence name, date, and security markings. For ADR, don't have a center security burn-in since it can get in the way of an actor's ability to sync to their mouth onscreen. If you must have a center burn-in, make it center-ish with partially transparent letter outlines only and no fill.
- If you're only getting ADR in a small portion of a reel and are worried about security in the ADR studio (especially for remote sessions), trim the export sequence to only the necessary scene, but make sure that the timecode is still correct. In Avid if you make a subsequence, it will keep the timecode it came from originally, which is what you want. Make one QT for each scene that you need. Alternatively, you can export one Quicktime of the whole reel but lift out the portions of it that are not needed so there's just black inbetween. This isn't totally necessary, but why have more material floating around than you have to?
- Dialogue WAV only
MPAA
- Ask the MPAA for their current spec list