Quick and Easy Dialogue Cleanup with Track Effects (aka RTAS)
On Star Trek Into Darkness I had the opportunity to break out of my usual Assistant Editor responsibilities and tackle a new experiment in temp sound editing. Will Files, Matt Evans, Robby Stambler and I formed a new mini-department within Editorial that was tasked with temping out the Editors' sequences and mixing them in 5.1. There's a lot to the process that is new and interesting, and I hope to get another post up soon that more fully flushes it all out, but for the moment all I want to talk about is a method for basic, global dialogue cleanup that is probably old hat to some (and par for the course for professional sound mixers), but was new and amazing to me.
This tip comes courtesy of Will Files, who as a loan-out from Skywalker Sound was the guy who guided this whole process on Trek and helped teach me, Matt, and Robby the ropes of the sound world.
NB: Since this article was written, Avid renamed RTAS into Track Effects. The text of this article still says RTAS everywhere, but know that in any modern version of Media Composer, it is now called Track Effects.
RTAS Is Your Friend
Before this show, I didn't really know what RTAS was useful for, much less how awesome it really is. It allows you to use many of the AudioSuite plugins that you would normally apply to a clip, and apply them to an entire track instead, without rendering (thus the RT in Real-Time Audio Suite). Up to five RTAS plugins can be chained together per track. When applied to dialogue tracks, you can chain together 3 RTAS plugins that will make your dialogue much more understandable and leave more room in other frequencies for your sound effects and music.
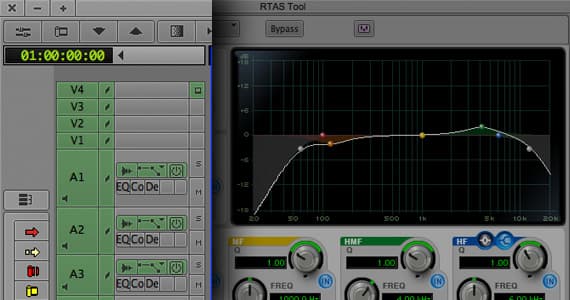
So, to get started, you have to show the expanded audio controls in your timeline, and make your track size big enough that you see the little RTAS boxes:
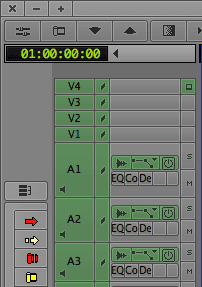
You can see that I have an EQ, a Compressor, and a De-Esser, in that order, on my dialogue tracks. Let's go through them:
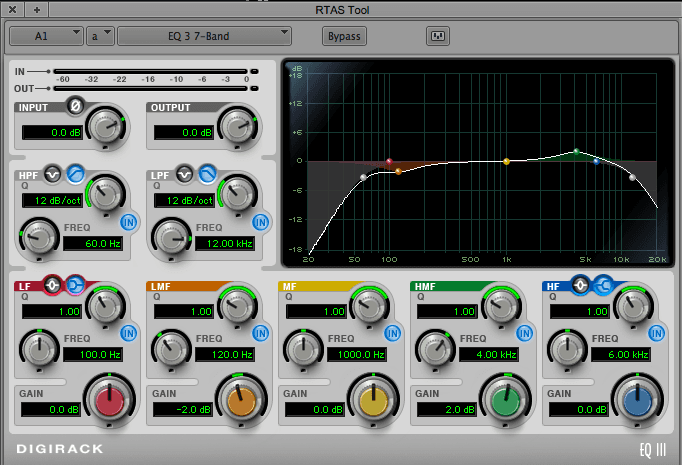
1) EQ
The EQ you add here is basically a band pass with a little customization. Everything below 60Hz is gradually stripped away, as well as everything above 12kHz. This is because your typical dialogue won't produce any audio in those frequencies that you want to keep, but by throwing it away you can start to address issues of boominess, high frequency hiss, and other technical problems with your production audio that get in the way of understanding the dialogue.
Aside from the band pass, this EQ also lowers frequencies around 120Hz by 2db, and raises frequencies around 4kHz by 2db. Again, this helps with boosting the frequencies of your dialogue that are most useful for comprehension, and removing frequencies that tend to get in the way, but without being as blunt as the band pass since these are frequencies you do want to hear.
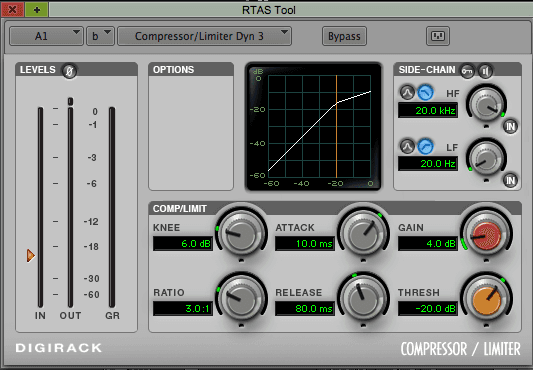
2) Compressor
Now that you've removed unwanted frequencies, it's time to normalize the volume. For that you use a Compressor, which will actively limit how loud your dialogue can get. If it gets too loud and crosses our set threshold, the Compressor will bring it back in line. The more the volume goes past the threshold, the more it will be reined in. This helps make sure there are no loud surprises in your dialogue, and will save you some of the hassle of mixing loud clips down to a more comfortable listening level.
In this case, we've modified three of the settings from their default states:
- Knee = 6.0 db. This adds a little curve right at the threshold point, so that the ratio of a loud input level to its compressed output level is approached more smoothly. Without it, the compression would switch on at full force when the volume crosses the threshold.
- Threshold = -20db. By moving this up 4db from the default -24db, we've allowed our audio to be a bit louder before it activates the compressor.
- Gain = 4db. This knob controls the output level of all audio passing through the Compressor, even audio that is below the threshold line. Since compression only reduces volume and can leave your dialogue levels feeling too low, adding a bit of make-up gain can help keep it at a good baseline.
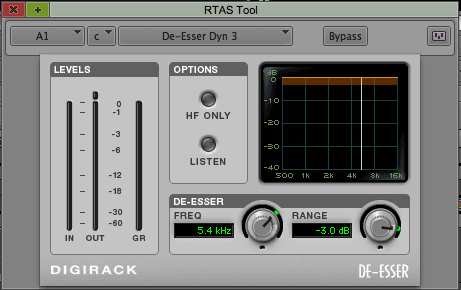
3) De-Esser
This one does exactly what its name implies, and helps with any S sounds in your dialogue that can be particularly piercing to listen to. It's basically another type of compressor that handles high frequencies instead of high decibel levels. On this we've set:
- Frequency = 5.4 kHz. This means the De-Esser will be triggered for frequencies above 5.4kHz.
- Range = -3.0db. When the De-Esser is triggered, it will reduce the gain of the signal by up to 3 db, which should help reduce the effects of any piercing audio.
As Quick as A-B-C
For those short on time, I've attached an Avid bin called Dialogue RTAS Effects.avb to this article which contains these three presets. They are labeled A, B, and C and should be applied to your RTAS chain in that order.
Tip: To quickly copy RTAS effects from one track to another, hold down Option and drag the effects you want to copy from one track's RTAS chain to another.